Debian QEMU/KVM bridged networking and VLAN
By default on every Linux distro after installing QEMU and libvirt two
kinds of networking are available:
- NAT: VM sits behind a NAT.
- MACVTAP: without going into much details it acts more or less like a bridged network, except not really. One of the most annoying limitations is that host to guest communication and vice versa are not really working well. Other important things might be broken as well, like for example VRRP. This mode is good for quick and dirty testing but not really for a stable environment.
BRIDGED networking is also supported by libvirt but requires some manual
work.
A possible networking schema could be the following:
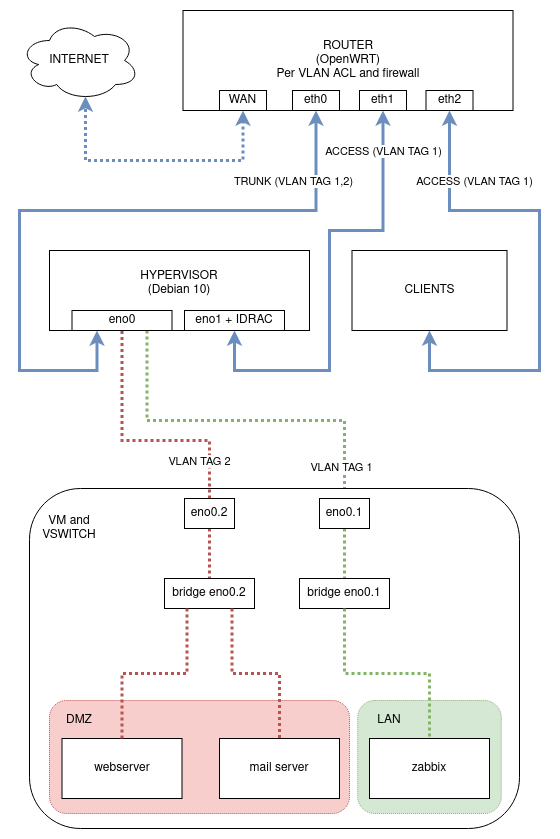
The goal, other than having proper networking for the VMs, is segregate the
server management interface, IDRAC and internal VMs from the VMs that run
services exposed to internet.
Bonus point would be setup network bonding, but let’s leave it for the next
episode.
Hypervisor configuration - Debian 10
Before we start let’s assume a few things have already been taken care of:
- installing
QEMUandlibvirt. IDRACor any other out of band management interface is configured to use physical networkeno1. That physical network adapter will also be used bymanagementinterface (SSH connection to Debian server).eno0is used by various virtual machines, some of which are inDMZwhile others are gonna be connected toLAN.
Most of the magic happens in /etc/network/interfaces:
# This file describes the network interfaces available on your system
# and how to activate them. For more information, see interfaces(5).

source /etc/network/interfaces.d/*

# The loopback network interface
auto lo
iface lo inet loopback

# Physical network interfaces
auto eno0
iface eno0 inet manual
auto eno1
iface eno1 inet manual

# VLAN aware network interfaces
auto eno0.1
iface eno0.1 inet manual
auto eno0.2
iface eno0.2 inet manual

# Bridge on eno1 VLAN 1 - Hypervisor management (and optional LAN VM)
auto eno1br0
iface eno1br0 inet static
	bridge_ports eno1
  bridge_waitport 0       # no delay before a port becomes available
  bridge_fd 0             # no forwarding delay
  bridge_stp off          # disable STP
	address 192.168.1.2
  netmask 255.255.255.0
  network 192.168.1.0
  gateway 192.168.1.1
  broadcast 192.168.1.255
  dns-nameservers 192.168.1.1

# Bridge on eno0 VLAN 1 - LAN VM
auto eno0br0-1
iface eno0br0-1 inet manual
	bridge_ports eno0.1
	bridge_waitport 0       # no delay before a port becomes available
	bridge_fd 0             # no forwarding delay
	bridge_stp off          # disable STP

# Bridge on eno0 VLAN 2 - DMZ VM
auto eno0br0-2
iface eno0br0-2 inet manual
	bridge_ports eno0.2
  bridge_waitport 0       # no delay before a port becomes available
  bridge_fd 0             # no forwarding delay
	bridge_stp off          # disable STP
This creates the following bridge interfaces that can then be used to connect virtual machines to the most appropriate network:
eno1br0used for hypervisor management (IP: 192.168.1.2) andLANVMs.eno0br0-1used forLANVM, bridged to interfaceeno0.1(physical adaptereno0, VLAN tag1).eno0br0-2used forDMZVM, bridged to interfaceeno0.2(physical adaptereno0, VLAN tag2).
IP forwarding also has to be enabled:
$ sudo echo "net.ipv4.ip_forward=1" >> /etc/sysctl.conf
$ sudo sysctl -p
Libvirt (QEMU/KVM) networking configuration
Libvirt needs to be instructed to use the bridges, to do this run the following commands on the hypervisor:
$ cat bridge-network-tag-1.xml
...
<network>
  <name>bridged-network-tag-1</name>
  <forward mode="bridge" />
  <bridge name="eno0br0-1" />
</network>
...
$ virsh net-define bridge-network-tag-1.xml
$ virsh net-autostart bridged-network-tag-1
Same thing needs to be done also for the other tagged bridge interface:
$ cat bridge-network-tag-2.xml
...
<network>
  <name>bridged-network-tag-2</name>
  <forward mode="bridge" />
  <bridge name="eno0br0-2" />
</network>
...
$ virsh net-define bridge-network-tag-2.xml
$ virsh net-autostart bridged-network-tag-2
Virtual machine configuration
This step can be done either by using virsh CLI utility or virt-manager,
either of them can be used to bridge the VM virtual network adapter to one of
the VLAN aware bridges that has been created on the hypervisor.
Supposing we have a virtual machine called mail that we want to put in DMZ,
SSH into the hypervisor (IP 192.168.1.2 in this example) and edit the VM
network configuration accordingly:
$ virsh edit mail
...
<interface type="bridge">
  <mac address="00:00:00:00:00:00"/>
  <source network="bridge-network-tag-2" bridge="bridge-network-tag-2"/>
  <model type="virtio"/>
</interface>
...
If the VM is goint to reside in the LAN network just replace source network
with the appropriate livirt bridge interface (in this example that would be
bridge-network-tag-2).
OpenWRT
In this case I have used OpenWRT, but this can be accomplished with basically
any decent router.
Navigate to Network -> Switch and configure it as follows:
VLAN ID | CPU0   | CPU1   | eth0   | eth1     | eth2     | wan
--------------------------------------------------------------------
1       | tagged | off    | tagged | untagged | untagged | off
2       | tagged | off    | tagged | off      | off      | off
3       | off    | tagged | off    | off      | off      | untagged
Where VLAN IDs represent the following networks:
- VLAN
1: LAN - VLAN
2: DMZ - VLAN
3: WAN
Another important thing is configuring interfaces and firewall rules for the
newly created VLANs in OpenWRT.
This is accomplished in Network -> Interfaces, from there add an interface
called DMZ, in General Settings tab specify a static IP and a DNS; in the
Firewall Settings tab create a new firewall zone and call it DMZ. Save and
apply.
The last thing to do is setup firewall rules for inter VLAN communication;
most likely one wants to be able to access everything from devices in VLAN 1
(clients and LAN VMs) but wants to lock out every VM who is in VLAN 2 (DMZ).
Create a new rule to allow DMZ zoned devices to reach WAN, this is
required for them to be able to reach internet.
At the same time add a firewall rule to allow LAN zoned devices to reach
DMZ.
Firewall rules are:
Zone           | Input  | Output  | Forward | Masquerading
----------------------------------------------------------
lan => wan/DMZ | accept | accept  | accept  | no
wan => reject  | reject | reject  | reject  | yes
DMZ => wan     | accept | accept  | reject  | no
This is it, a Debian box is now a proper hypervisor.