Kubernetes cluster for manufacturing engineering: tale of an epic commissioning
- Introduction
A quite big company that produces parts for some of the most important
automotive industry companies was interested in a cloud-based system to
monitor the overall efficiency of their production machines, analyze some key
parameters and optimize the production activities scheduling.
Goal of the project was to connect eleven industrial manufacturing machines to
the cloud, extract specific machine data and develop a web application for
the visualization and management of such data, while guaranteeing information
confidentiality and security.
Furthermore, one fundamental requirement of such system has been the
bidirectional integration with the customer’s ERP system, in order to
synchronize the production JOBs and manage their execution on the corresponding
machines.
To fulfill such requirements, the project team has engineered and then implemented
an hybrid edge-cloud solution in which the software has been packed into various
containers that are orchestrated and managed, at the edge level, by a Kubernetes
cluster.
This technology ensures an optimal load balancing between the available
resources as well as a high availability in case of hardware or software failures.
While IT enterprises do not question the value of containerized applications
anymore, the use of such kind of technologies within a manufacturing environment
hasn’t been completely explored yet.
In the following paragraphs we will go into details on how we engineered and
built the system despite all the difficulties we had to overcome.
- K8S & containers
The current trend of application development revolves around the concept of
microservices: the idea is to split a big software that otherwise would be
a monolithic blob into smaller independent software, all these components
communicate with each other using standard protocols like MQTT or gRPC.
The next logical step people came up with was the necessity to decouple
software from the hardware and operating system, the solution to this need
is called containers.
Docker is the containerization software platform that managed (also thanks
to the endorsement of companies like Red Hat, Amazon and IBM) to elevate itself
from the crowd and became what can now be considered a standard de-facto in
this field.
It allows to easily pack custom software into a “container image” which also
contains all the required libraries and runtimes needed to execute the program.
Docker implements the so called OS-level virtualization paradigm, this enables
containers to run on any operating system that supports Docker and doesn’t
force the system administrator to install and manage all the libraries and
dependencies required to run various software on the same “physical” machine.
This makes deployment and maintenance tasks easier and less prone to errors.
To manage multiple Docker containers various tools exist, the most famous of
which is Docker Compose.
When the number containers grows and the need to use multiple physical servers
arise Docker Compose does not cut it anymore: here is when orchestration
and Kubernetes (a.k.a. K8S) comes into play.
Kubernetes is an open source software for automating deployment, scaling and
management of containerized applications; the project was started by Google
and is built on the experience acquired by running literally millions of
containers for more than a decade.
Kubernetes takes the concept of containers to a completely new level by
bringing in the features of a typical cluster to the container world: high
availability, load-balancing, automatic scaling, centralized logging.
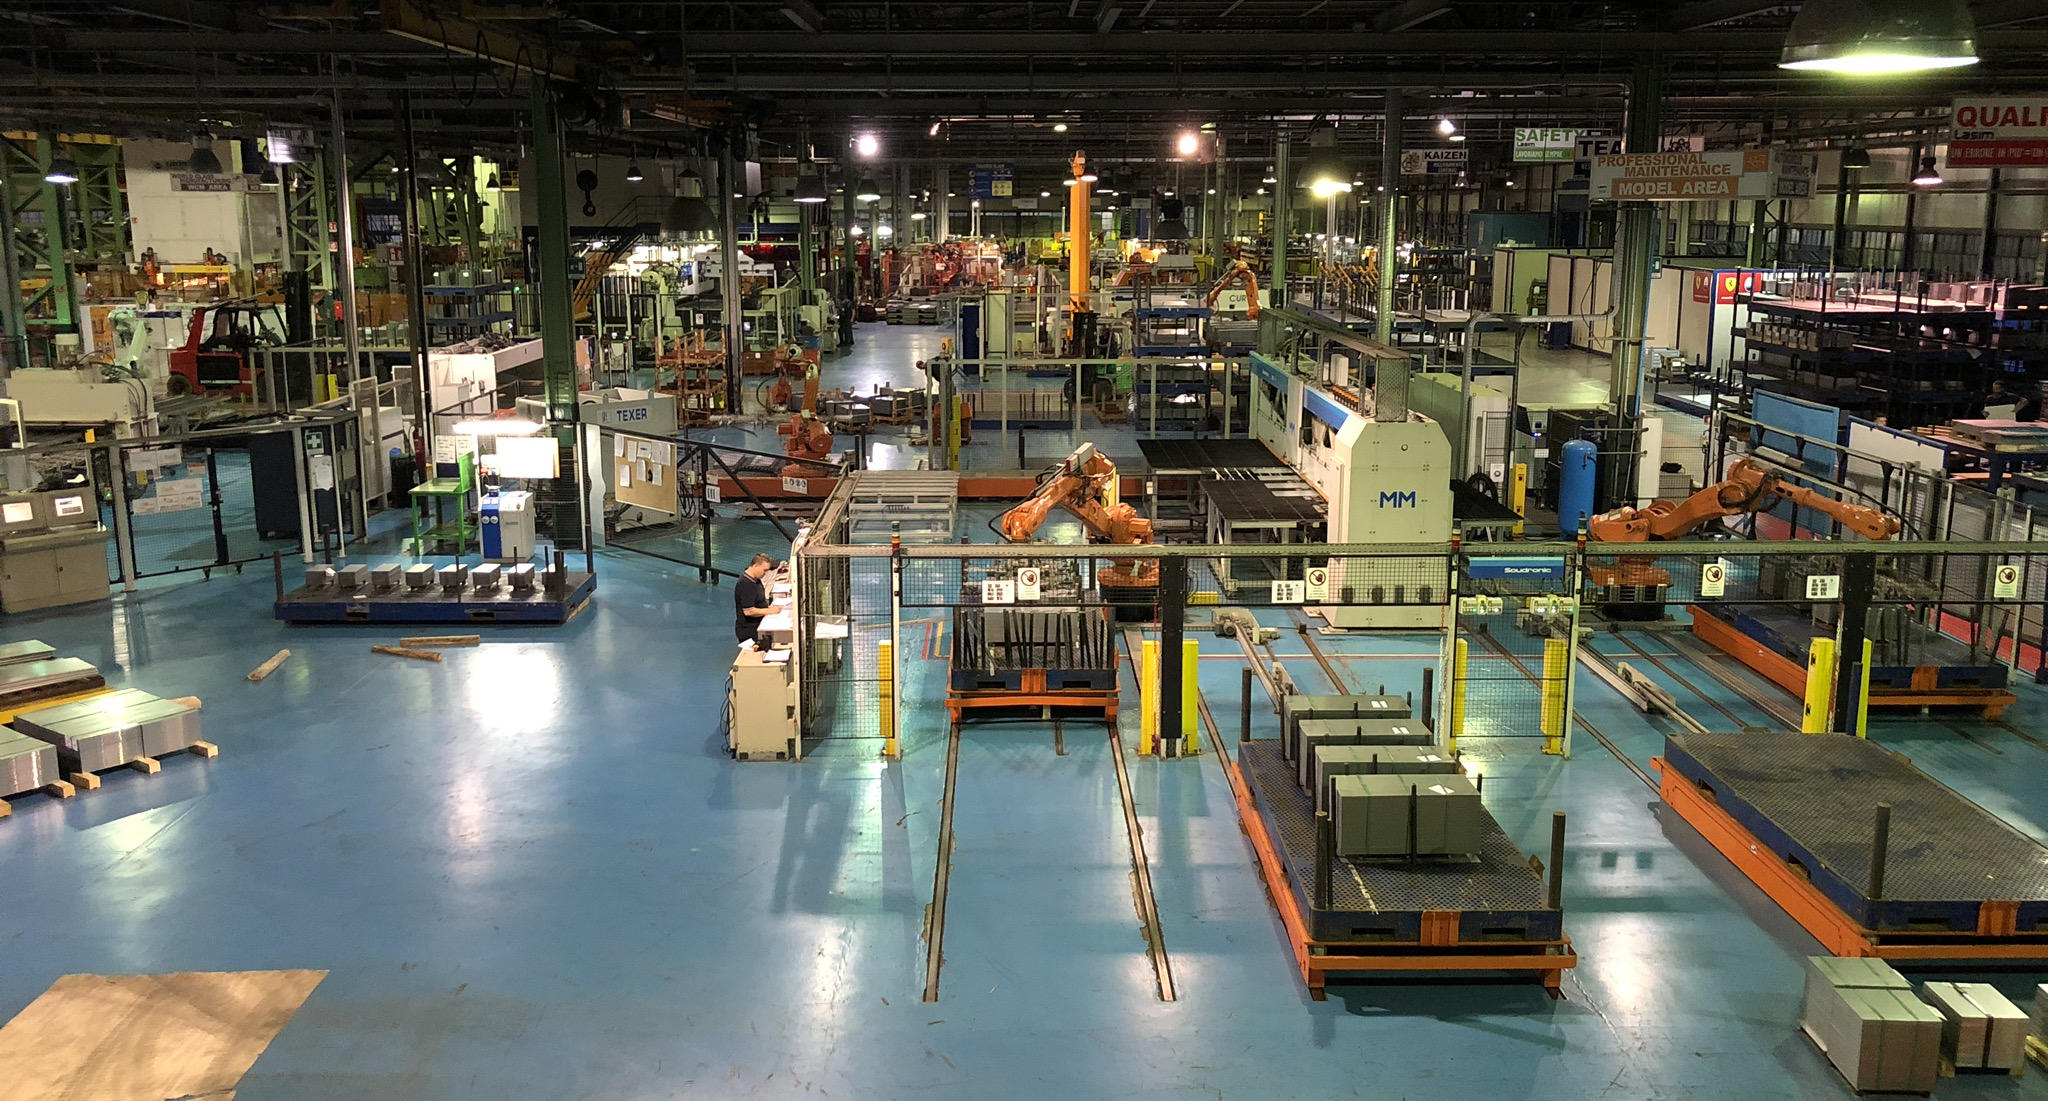
- HARDWARE ARCHITECTURE
The following schema describes how the various components of the system are logically linked and connected with each other; for the sake of simplicity a few minor details have been omitted.
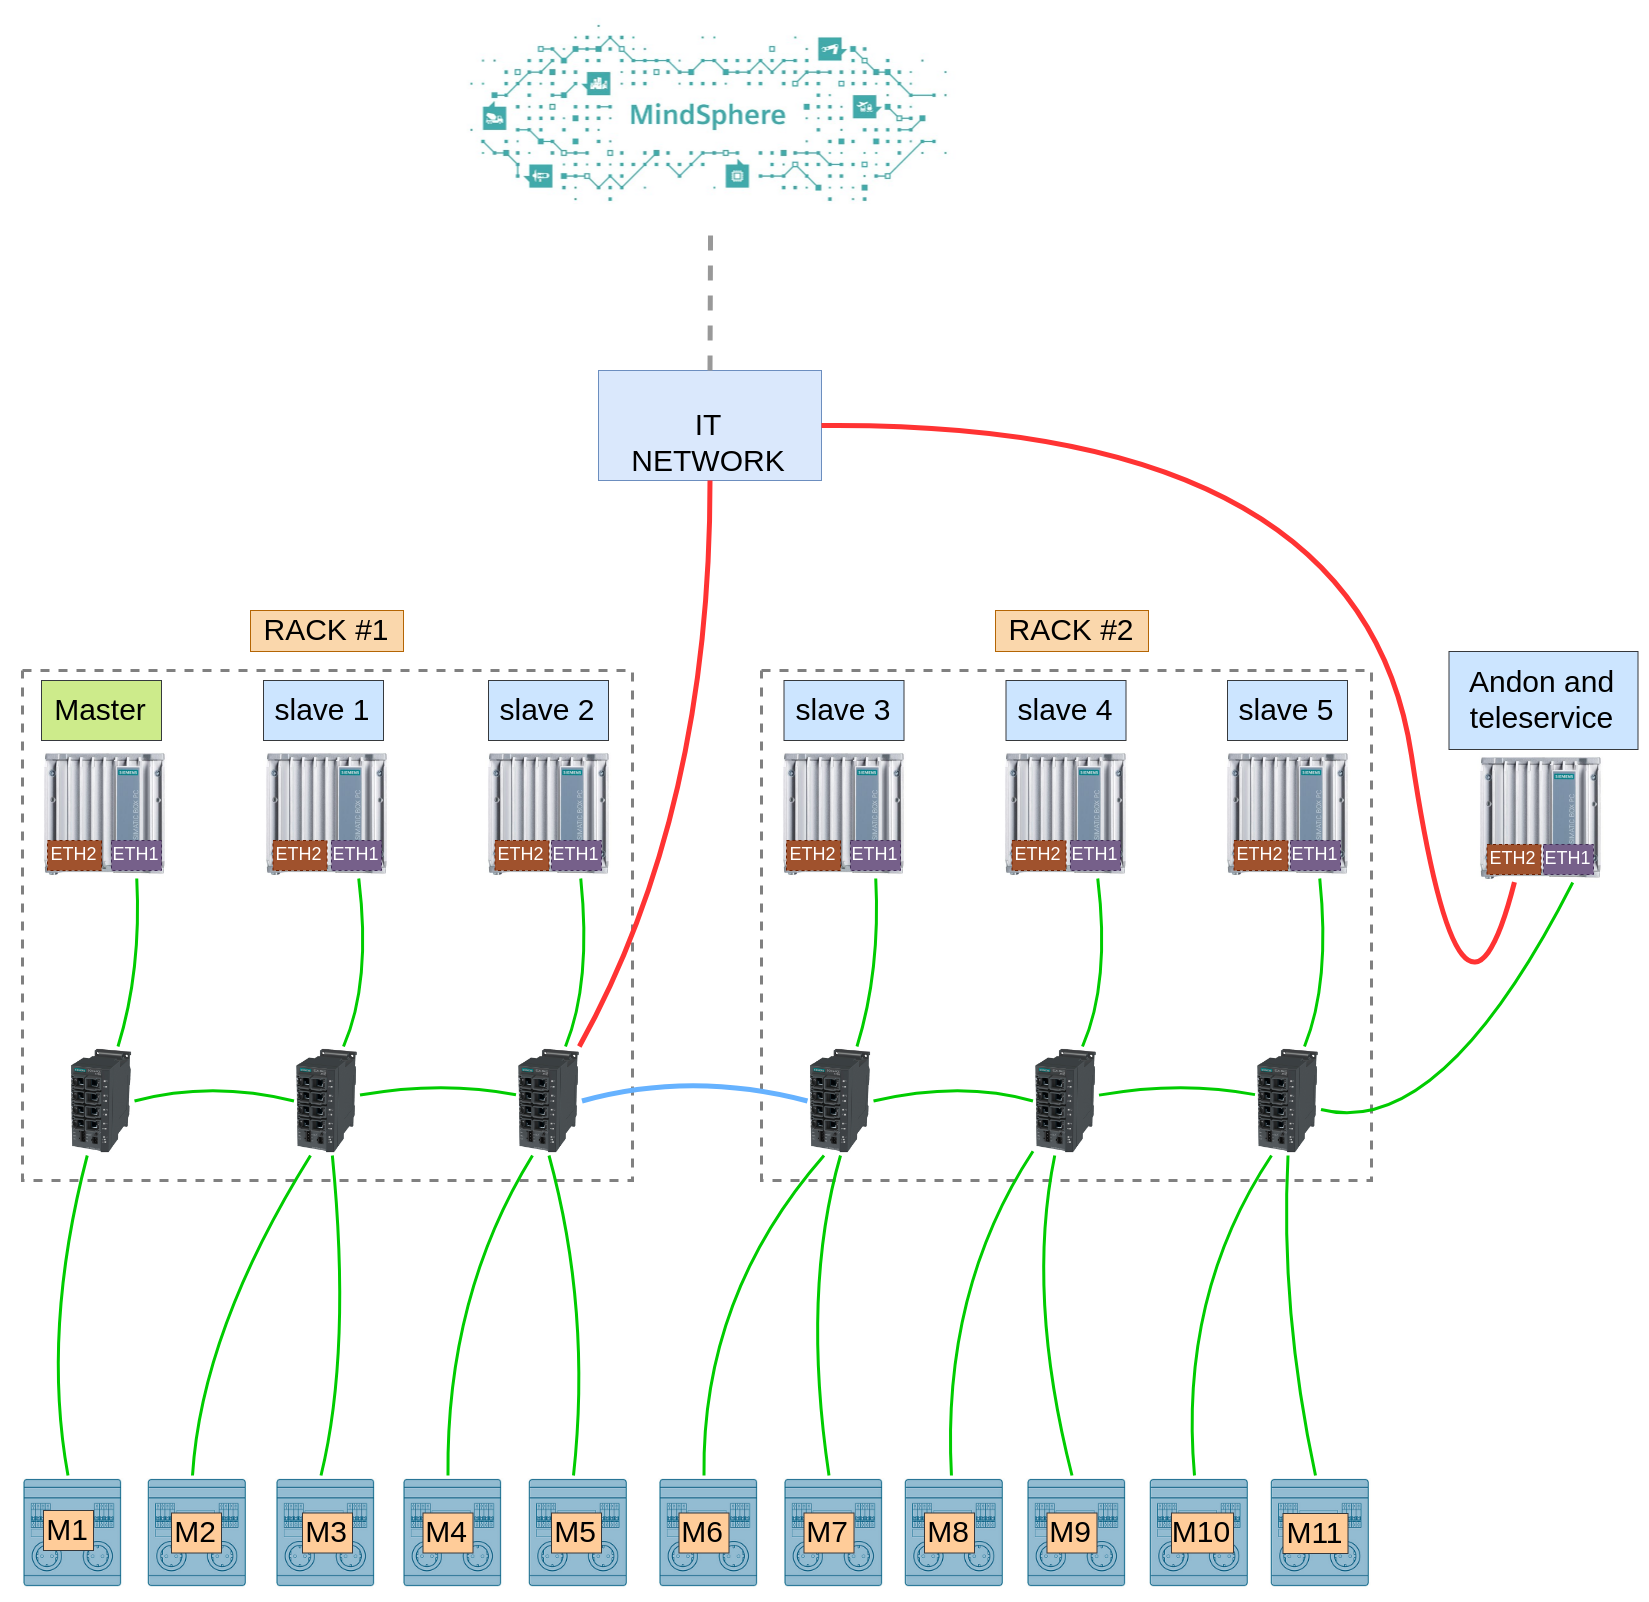
The cluster has to be physically close to the automation hardware (namely PLCs)
because they interact directly with each other using Siemens S7 protocol,
this forced us to pick rugged components that are capable of running reliably
in very harsh environmental conditions (~40 C during the summer in a dusty
environment).
Hardware is installed in 2 different racks, every computer and PLC sits in the
same network and everything is connected by a few industrial network switches.
The only computer not part of the cluster is attached to a screen and is
used as Andon; it also
runs our teleservice software, this comes in very handy in case we need to
perform maintenance tasks remotely on the cluster.
The hardware platform we have chosen is Siemens SIMATIC IPC127E, a very compact
form factor, yet powerful, industrial computer that can be used as Internet
of Things gateway.
SIMATIC IPC127E provides all the necessary features making it the perfect
platform to build innovative solutions that are going to be installed in new
or pre-existing production plants:
- Ultra compact form factor with a volume of around 0.3 liters and integrated industrial power supply.
- Built to run 24/7 with an ambient temperature of up to 50 C.
- CPU Intel Atom quad core providing high performance together with a very low power consumption; other features are: system memory up to 4 GB of DDR4, 3x Gigabit Ethernet port, 4x USB 3.0 and DisplayPort.
- 11 years of hardware support.
Other that the hardware itself, another crucial component is the operating
system.
Linux kernel based operating systems have been a valid choice for quite some
time, the only downside is that, like with most open source software, there
isn’t a company providing post sale support.
SIMATIC Industrial OS solves this issue, it is sold and supported directly
by Siemens and is built around the requirement of being a lightweight yet
reliable ground on which critical applications and software can be deployed
efficiently and reliably.
It is based on Debian 9, can be easily installed using an USB drive which
also includes an installation wizard and a system backup/restore tool.
During the wizard it is possible to install various software like GNOME and
other lightweight desktop environments, Docker and other software that make
the integration with SIMATIC products easier.
The operating system itself is covered by the same post sale policies and
warranty of every other Siemens product.
- SOFTWARE ARCHITECTURE
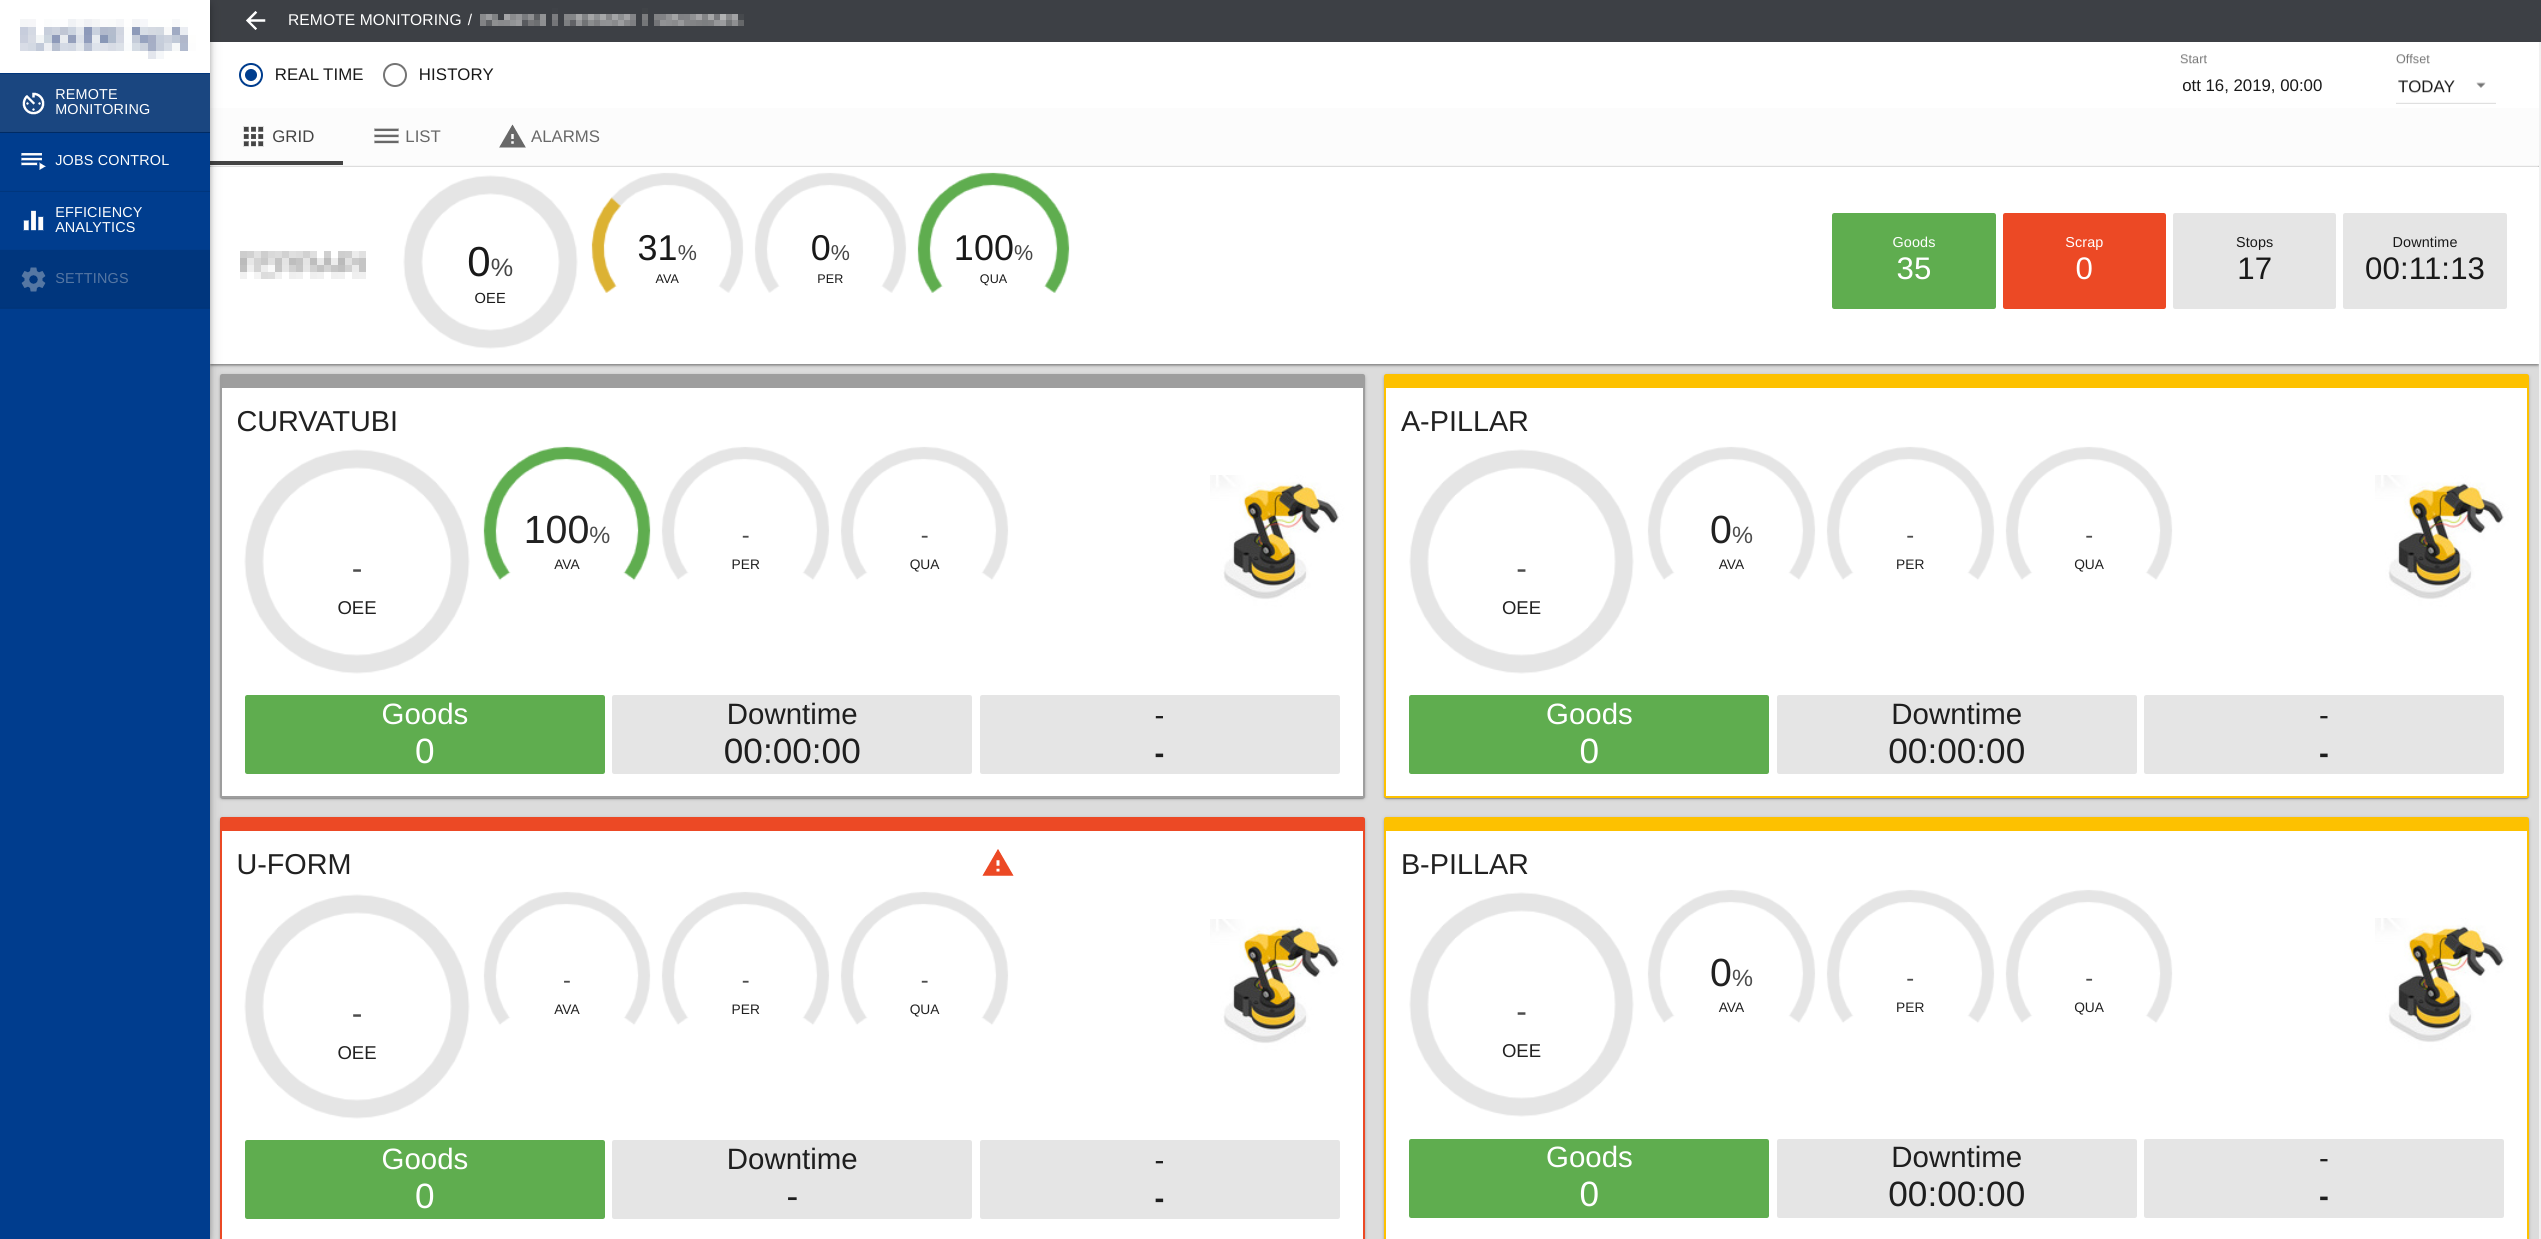
The software is comprised of four macro-components, the first one is a
cloud WEB application that is used by the plant personnel to monitor and
interact with the machines.
In this particular case the WEB app is a NodeJS application built with Angular
framework while the backend is written in Python.
The other three software macro-components, which are executed in edge, are:
- Machine POD (one per physical machine)
- Job Manager POD
- Data Pushlisher POD
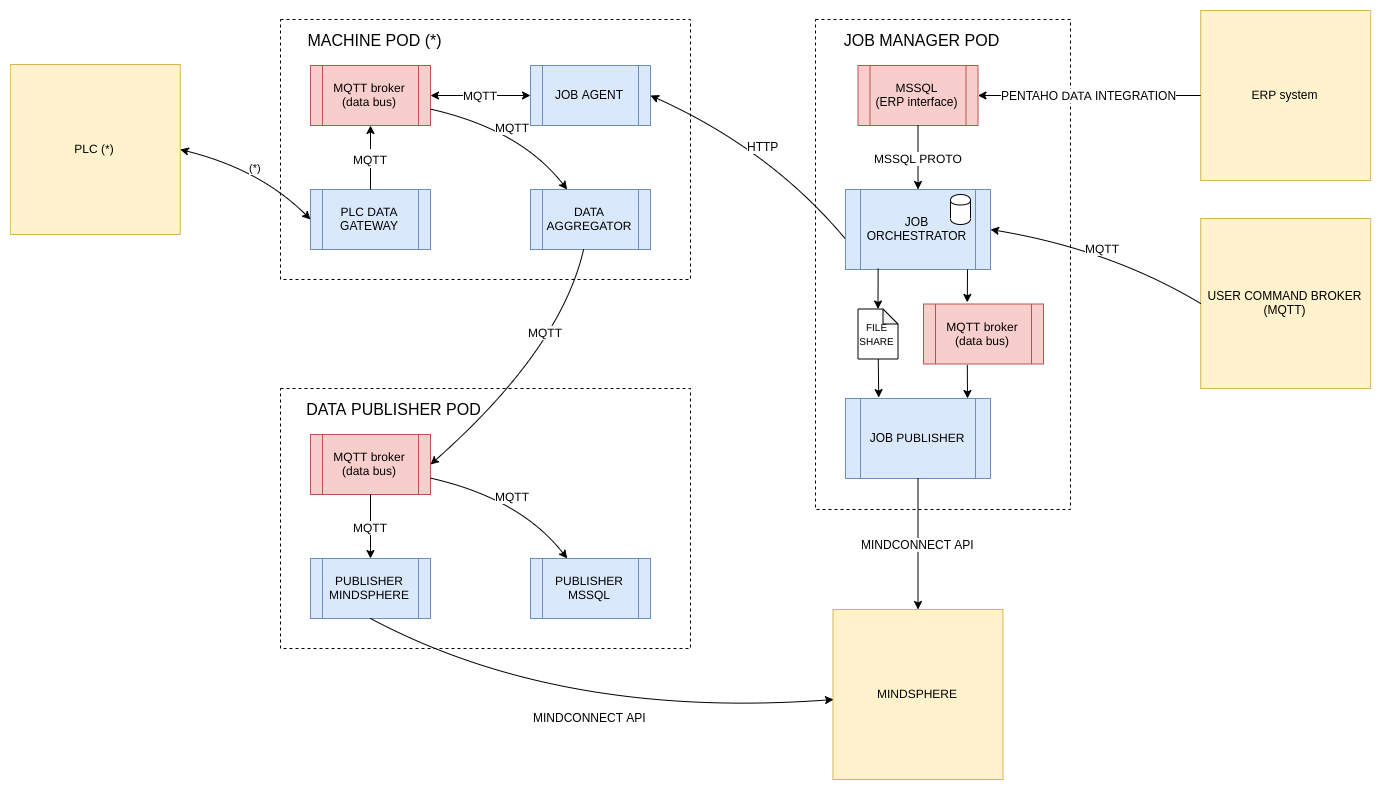
What we have is a Machine POD for every physical machine, each of these is
specifically tailored to interact with a particular machine using a certain
communication protocol: some of the machines use Siemens S7, others expose
an edge SQL database that can be used to send commands and query for the
outputs, others use files to communicate with the external world.
In this regard, the microservices based architecture really shines because
thanks to that it is really easy to adapt the software to every possible scenario.
Even more, to connect a new machine the only operation required is to spawn up
another POD and in the worst case scenario write a custom PLC DATA GATEWAY
component.
Everything else is just plug and play.
Job Manager POD is the most critical part of the system because it is the
component that manage production JOBs’ execution, it uses a SQL database to
store a list of production tasks; the synchronization between this database
and the ERP system is delegated to a third party software.
All the production jobs are loaded into the system and can be executed on
a specific machine from the cloud WEB application, the communication between
JOB Orchestrator and JOB Agent of the specific machine is performed by
calling a REST API.
Data Publisher POD is the component that glues everything together, it
collects data from all the machine PODs and push them to the cloud so that
they can be picked up and displayed by the cloud WEB application.
- SETTING UP KUBERNETES
Skipping the boring installation procedure of the OS let’s move directly to
the interesting part: setting up Kubernetes.
The first step is removing Docker and anything related to it if we had it
previously installed; generally speaking we want to run the same version of
the software on every node of the cluster.
$ sudo apt-get remove docker docker-engine docker.io containerd runc
$ sudo apt-get install \
    apt-transport-https \
    ca-certificates \
    curl \
    gnupg2 \
    software-properties-common
$ curl -fsSL https://download.docker.com/linux/debian/gpg | sudo apt-key add -
$ sudo add-apt-repository \
   "deb [arch=amd64] https://download.docker.com/linux/debian \
   $(lsb_release -cs) \
   stable"
$ sudo apt-get update
$ sudo apt-get install docker-ce docker-ce-cli containerd.io
Now it is time to install Kubernetes, this can also be done easily by adding the official repository to our system.
$ sudo apt-get install -y apt-transport-https curl
$ curl -s https://packages.cloud.google.com/apt/doc/apt-key.gpg | apt-key add -
$ cat <<EOF >/etc/apt/sources.list.d/kubernetes.list
deb https://apt.kubernetes.io/ kubernetes-xenial main
EOF
$ sudo apt-get update
$ sudo apt-get install -y kubelet kubeadm kubectl
apt-mark hold kubelet kubeadm kubectl
Instruct the kernel to send packets traversing the network bridge to iptables.
The above procedure has to be performed on every node of the cluster.
It might be worth looking into using an automated provisioning software to
perform those tedious steps on multiple nodes.
I used a mix of bash scripts and Ansible Playbooks.
Setting up the Master
To setup the master, run the following commands as root:
$ kubeadm init
$ systemctl enable --now kubelet
Save the output of kubeadm init command, it contains the command to run on
slaves to have them join the cluster (kubeadm join ...).
Since Kubernetes can be controlled only by a non root user (which is named
edge in this case), setup your environment accordingly:
$ su edge
$ mkdir -p $HOME/.kube
sudo cp -i /etc/kubernetes/admin.conf $HOME/.kube/config
sudo chown $(id -u):$(id -g) $HOME/.kube/config
Last but not least, install a network plugin for Kubernetes; Flannel is the most battle tested one:
$ kubectl apply -f https://raw.githubusercontent.com/coreos/flannel/master/Documentation/kube-flannel.yml
Join the cluster
On each slave node run the kubeadm join ... command you saved before; keep
in mind that the cryptographic keys generated by the master are only valid
for 48 hours, they can still be regenerated so it will always be possible to
join more slaves.
Docker registry credentials
Kubernetes works by pulling images from a container registry, to access a private one it is required to create a secret which will contain the login credentials.
$ kubectl create secret <secret_name> --docker-server=<your_registry_server> --docker-username=<your_name> --docker-password=<your_password> --docker-email=<your_email>
Now that the cluster is running, let’s write two simple deployment script
to setup two PODS.
First setup a MySQL Server deployment:
mysql.yml
apiVersion: v1
kind: Service
metadata:
  name: mysql
  labels:
    app: mysql
spec:
  type: NodePort
  ports:

    # MYSQL
    - port: 3306  # Internal port on which the MYSQL POD is listening to
      name: mysql # Name of this particular rule
      protocol: TCP
      targetPort: 3306 # Port mapped inside the cluster, can be used by other Deploymens' PODs to access the database server
      nodePort: 30006 # Port mapped outside the cluster, service can be access from any IP of every machine of the cluster

  selector:
    app: mysql

---

apiVersion: apps/v1
kind: Deployment
metadata:
  name: mysql
spec:
  replicas: 1
  selector:
    matchLabels:
      app: mysql
  template:
    metadata:
      labels:
        app: mysql
    spec:

      volumes:

        # MSSQL - save persistent data (DB, logs) on disk
        # - name: mysql-data
        #   hostPath:
        #     path: /opt/persistent-data/mysql

      containers:

        # MYSQL
        - name: mysql # Name of the container
          image: mysql # No repo specified, image pulled from DockerHub
          # volumeMounts:
          #   - name: mysql-data
          #     mountPath: /var/lib/mysql
          ports:
          - containerPort: 3306
            hostPort: 3306 # Port mapped on the physical machine on which the container is running
          env:
            - name: MYSQL_ROOT_PASSWORD
              value: passwordpasswordpassword
The second deployment contains a shell with the tool nmap, a popular port
scanner and security assesment command line utility.
This can be used to better understand how networking works inside the cluster.
nmap.yml
apiVersion: apps/v1
kind: Deployment
metadata:
  name: nmap
spec:
  replicas: 1
  selector:
    matchLabels:
      app: nmap
  template:
    metadata:
      labels:
        app: nmap
    spec:

      containers:

        # NMAP
        - name: nmap # Name of the container
          image: securecodebox/nmap # No repo specified, image pulled from DockerHub
To run the deploymens copy the two files on the master node of the cluster (or
run them from a workstation) and start them using kubectl:
$ kubectl apply -f nmap.yml
$ kubectl apply -f mysql.yml
To get into nmap container execute:
# Get the name of the PODs
$ kubectl get pods
# Get a shell into the specific container
$ kubectl exec -it <nmap_pod_name> --container nmap /bin/sh
I leave to the reader as homework to figure out how to save containers’ data
persistently, this can be accomplished in various ways which depend on the
specific platform where the Kubernetes cluster is physically deployed (GKE,
EKS, on-premises, etc).
There is no golden rule when it comes to data persistence, though, a NFS volume
hosted on a NAS might be a good solution for on-premises K8S clusters.
Another possibility are Persistent Volume Claims (PVC), both options are
worth being explored.
- WHY K8S?
In our case Kubernetes brings a few huge advantages over running services on many different computers not part of a cluster:
High availability: imagine that a slave node is not working anymore because of an hardware (e.g. broken hard disk drive) or software failure (e.g. kernel panic).
Kubernetes detects that the node is down and reschedule all the deployments that were running on it to be executed on the other nodes.Load balancing: resources usage is kept under control at all times, this means that if one node is overworked the cluster moves some of its PODs to the other nodes.
The system always tries to keep the nodes’ load under control and have all the services spawned on as many nodes as possible.
This keeps the average load balanced and roughly at the same level on all nodes to ensure that the services are always running in the best possible conditions.Ease of management: it is possible to manage the whole cluster directly from a remote workstation, all it is required to do so it to have
kubectlinstalled and have imported a few configuration files.
The easier a system is to manage, the less issues arise while administering it; having a system that generally just works means less downtime and increased added value for the end user/client.